Den här artikeln finns även på:
![]() Svenska
Svenska
One of the advantages of Oderland Cloud is that you can easily change which system resources a server has access to. You control this with the so-called flavor the server is set up with and you can change the flavor whenever you want. Sometimes it is even possible to upgrade a server with more memory or more CPU without rebooting.
Change the number of CPU cores and/or amount of RAM
Sometimes you need more CPU power or more memory on your server and you change these resources as follows:
- Begin by logging on to the Oderland Cloud control panel.
- When you’ve logged in, go to
Compute(the cube-like icon) ->Virtual machinesin the menu to the left.
- If your server is not set up with hot-plug support, you now need to shut down the server before you can change the flavor. Even with hot-plug support, you need to shut down the server if you want to reduce system resources. Do this by first clicking on the row for the server and then on the
Shut downbutton.
- You may now be asked to ‘shelve virtual machine’. You should only use this feature if you want a server to be shut down for an extended period of time, so don’t tick the box for this, just click the
Shut downbutton.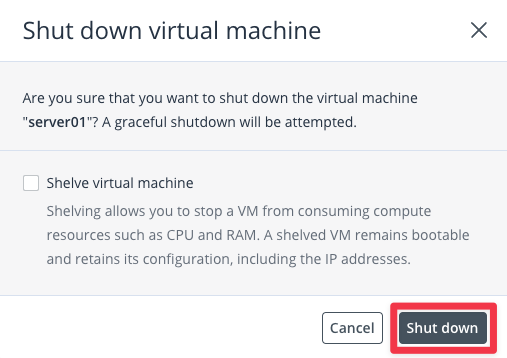
- Now scroll down the list below the Shut down button until you see the
Flavorrow. Click on the pencil icon on that row to access the list where you can select the flavor.
- Select new flavor for your server from the list based on what configuration of CPU cores and RAM you want. Then click the
Donebutton.
- After adjusting the server’s settings (this can take a few minutes, but is usually faster than that), start the server again by clicking the
Runbutton.
The server is now starting up with the new system resources.
Increasing the size of a disk
Sometimes you need more storage space on an existing disk on a server. To expand a disk in the Oderland Cloud, do the following:
- Begin by logging on to the Oderland Cloud control panel.
- When you’ve logged in, go to
Compute(the cube-like icon) ->Virtual machinesin the menu to the left. - Click on the row for the server to which the disk you want to extend is attached, scroll down in the right part of the window and click on the disk in the list of attached disks, under
Volumes.
- You will now see the properties of the disk. Scroll down until you see
Sizeand click on the pencil to bring up the edit option.
- Enter the new desired size of the disk (which must be larger than it was before, you cannot shrink a disk). Then click the tick mark to save the change.

- The change is now saved. You may need to restart your server for the change to take effect.
Enabling/disabling hot-plug support
If you want to upgrade or downgrade the CPU and RAM on a server during operation, the hot plug feature must be enabled on it. Here we describe how to enable support for hot plug (and conversely, how to disable it if you no longer want to use it).
To adjust the setting, do the following:
- Begin by logging on to the Oderland Cloud control panel.
- When you’ve logged in, go to
Compute(the cube-like icon) ->Virtual machinesin the menu to the left. - You now need to shut down the server in order to change the hot plug setting. To do this, first click on the row for the server and then on the
Shut downbutton. - Once the server has shut down, scroll down in the same part of the window where the Shut down button is located until you find the line for
CPU and RAM hot plug. Click on the pen to the right of the line to unlock the setting for changes.
- Now check
Enable hot plugif you want to activate the function, or uncheck it if you want to disable it. When you are done, click the tick on the right to save.
- You can now boot the server by clicking the
Runbutton on the same row where you previously found the Shut down button.