Den här artikeln finns även på:
![]() Svenska
Svenska
In this guide, we’ll show you how to restore files, databases, email accounts, and email forwarders from backup using Acronis Backup.
Accessing the backups
To get started with Acronis Backup, log on to cPanel and locate the icon Acronis Backup under the section Files.
After clicking the icon, you’re presented with a list of available restoration points from the backup system. No matter what kind of data you wish to restore, click the date/time for the backup point you want to restore from.

Acronis now prepares the backup point so you can access its content.

How to restore files
To restore files, click Files under Types.

You’ll now see a file manager-like view, where folders and files are visible. If you click the name label of a folder, you will enter the folder and see its content.

On top of the list of folders and files, you’ll see a checkbox. Selecting this selects all folders/files in view for restoration. You also have individual checkboxes for each folder and file if you want to restore with more precision.
When you have selected all folders/files you wish to restore, click the Recover button above the list (1). If you want to, you can also download a .zip file containing the selected folders/files via the Download button (2).

When you click the Recover button, a popup box is shown prompting you to decide if you wish to delete files in the original location that has been created on the account after the backup was created (1). For example, if you are about to restore a hacked website, this can be practical to use to remove any unwanted files. If you do not check the checkbox, those files will stay on the account after the restoration is complete. Regardless if you select this or not, commence the restoration by clicking the Start recovery button (2).
You will now see that the recovery has started:

Once it’s done, you will see this confirmation:

How to restore domains
If you click Domains under Types, you may restores files for one or more domains on your web hosting account. It can be seen as a shortcut to the correct folder on the account if you need to restore the files for a certain site.

You will now see a list over the domains that were set up on the web hosting account at the moment when the backup was taken. You will also see if the domains is the account’s main domain, an addon domain, or a subdomain.

Click the checkbox to the left of the domain(s) you wish to restore the files for, and click Recover to restore them directly to the server. You can also download the files and folders for the selected domain(s) via the Download button.
If you click the Recover button, you will see a popup box where you get to confirm the restoration.

Click Start Recovery to begin the restoration process.
You will now see that the recovery has started:

Once it’s done, you will see this confirmation:

How to restore databases
To restore databases, click Databases under Types.

You’re now presented with a list of the databases that existed on the account when the backup was created.

On top of the list of databases, you’ll see a checkbox (1). Selecting this selects all databases for restoration. You also have individual checkboxes (2) for each database if you want to restore with more precision.
When you have selected all databases you wish to restore, click the Recover button above the list (3). If you want to, you can also download a .zip file containing the selected databases via the Download button (4).
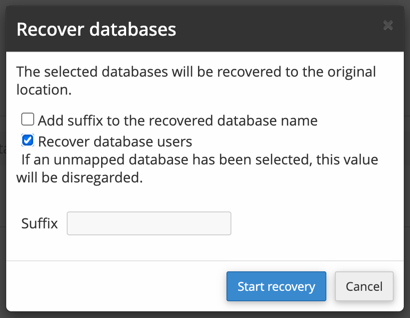
When you click the Recover button, a popup is shown asking you to make a few choices before the recovery:
Add suffix to the recovered database name: If you want to restore the database to a new database, you can let Acronis create a new one where a suffix is added to the end of the database name. Tick the box if this is what you want to do.
Recover database users: Check this box to restore the connection to the restored database and the database user(s) that were connected to it at the time of the backup. If you do not check this box, there is a risk that the user will be disconnected from the database and a website that uses it will stop working after the restore.
Suffix: If you have selected the option to add a suffix to the end of the database as described above, enter the desired suffix here.
Once you have made your choices regarding the recovery, click the Start recovery button to begin the process.
You will now see that the recovery has started:

Once it’s done, you will see this confirmation:

How to restore email accounts
To restore email accounts, click Mailboxes under Types.

You’re now presented with a list of the email accounts that existed on the account when the backup was created.

On top of the list of email accounts, you’ll see a checkbox (1). Selecting this selects all email accounts for restoration. You also have individual checkboxes (2) for each email account if you want to restore with more precision.
When you have selected all email accounts you wish to restore, click the Recover button above the list (3). If you want to, you can also download a .zip file containing the selected email accounts via the Download button (4).

After clicking the Recover button, you’ll be presented with a popup box where you get to confirm that the recovery should be done. The checkbox next to “Delete any emails that were created after the backup” does unfortunatelly not work, messages that has appeared on the account since the backup was saved will be deleted even if the box isn’t checked. To confirm the restoration, click Start recovery.
You will now see that the recovery has started:

Once it’s done, you will see this confirmation:

How to restore forwarders
To recovery forwarders for email, click Mail forwarders under Types.

You’re now presented with a list of the email forwarders that existed on the account when the backup was created.

On top of the list of email forwarders, you’ll see a checkbox (1). Selecting this selects all domains for email forwarders restoration. You also have individual checkboxes (2) for each domain if you want to restore email forwarders with more precision.
When you have selected all domains for which you wish to restore email forwarders, click the Recover button above the list (3). If you want to, you can also download a .zip file containing the selected email forwarders via the Download button (4).

After clicking the Recover button, you’ll be presented with a popup box where you get to confirm that the recovery should be done. To confirm, click Start recovery.
You will now see that the recovery has started:

Once it’s done, you will see this confirmation:

Operation log for backup restorations
At any time, you can click the tab Operation log to see all past activity regarding recoveries started from your cPanel account.

In the table you can see:
Status– If a restore is under way, succeeded, or failed.Operation type– What was restored, and if it was sent to the server of if a .zip file has been prepared for download.Start time– Timestamp for when the recovery process was started.Finish time– Timestamp for when the recovery process was finished.Elapsed time– How long the recovery process took.Actions– Various actions you can take on the log entries.View details– See more in detail what was restored.Download– If you choose to download a .zip file from the backup server you’ll find a link here to the file. If the link is missing, perform the recovery operation again, and a new file will be prepared (they are only stored for a limited time).